Friday 2 December 2016

3D Printed Object: Final Outcome

Continuing from my last post on merging Monica and I's objects to 3D print I found I wasn't happy with the ones I came up with so on Mondays class I came up with a new and better design that I liked. Monica also picked one of her designs and we were ready to print.

+
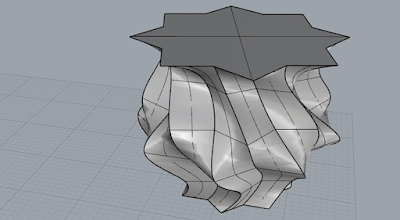
My new object design combines these to objects Monica and I made.


My object printing away.


Our final objects 3D printed!


I found this to be a really cool and interesting project getting to 3D print our personally designed objects. The process was pretty smooth however we did come across some challenges along the way. One of the first problems we faced was that my object getting put into the printing software had too big of a file size and the program kept crashing so we had to fix that and scale down my object a bit. We also faced another minor problem where the printer would not preform a test extrude so we ended up just reconnected it and that was fixed. In the end I believe our objects came out nicely and I can't wait to use I 3D printer again sometime in the future.

Sunday 27 November 2016

3D Printed Object: Merging

After making concepts for a 3D object I partnered up with my classmate Monica and the next step was to make a hybrid object out of both of our concept objects. Last Thursday we met up and exchanged our objects and discussed about the project. We then decided to take each others concepts home and create hybrid concepts on our own then meet up next week and decide on one to print. Here are our concepts we chose and then hybrid concepts I came up with.

My Concepts:


Monica's Concepts:


My Hybrid Ideas:

+
Hybrid of my rocket and Monica's star object to make a rocket blasting off.

+
Hybrid of my cone and Monica's star object, (The top will be capped in final object if this one is chosen).


I found this portion of the project to be a fun challenge. It was difficult to combine and come up with hybrids of both our objects while still retaining distinguishing features from both. None the less it was enjoyable and look forward to printing soon.


Thursday 17 November 2016

3D Printed Object: Prototype/Concept Generation

For this project the objective was to make some concept objects in Rhino, to eventually 3D print into the real world. The objects that I am designing also have to be self supporting.


A pyramid/stair object.


A twisting hexagonal cup/holder.


A rocket.


An hourglass looking shape.


The Calgary Tower.


Squiggly cone.


A 7.62 Caliber Bullet.


Vase type object.


Twisted cube holder.


Warped cup.

I really enjoyed this first stage of the project making these concepts/prototypes. It was a fun challenge having to come up with making objects that are self supporting yet still interesting. Overall I was happy with how my objects came out and can't wait to develop them more and eventually get to the 3D printing.

Sunday 13 November 2016

Papercraft Final

This is the final papercraft object after the two previous prototypes.


The Final Object

The template ready to be cut.

Cut beams ready to be glued and folded.


Schematic

Reflection:
I enjoyed this papercraft project and the challenges and process involved. One main challenge I faced in the previous prototype was glueing my object together. This was easily solved by not applying the vinyl which I think did not work well with the glue I was using and with that made the structure more sturdy. I also decided to make refinements to the graphics of my object, giving it a more metallic/industrial look for which I was going for. Overall I'm happy with how my object turned out in the end and enjoyed the challenge in making it.


Monday 7 November 2016

Papercraft Prototype V2

After the first papercraft prototype was complete a second version was needed to be created to refine the design of my object.

This was me experimenting with a new way to construct my object by having the arms of my object go through holes in the middle. I eventually came to the conclusion that it was not worth fussing about for the same structural outcome and time was better spent on the design and graphics on the object. 

More experimenting.


This was the final outcome, I was not that fond of how this second prototype turned out. I had difficulties with glueing my pieces together which I didn't anticipate, even trying vinyl on vinyl glueing. I ended up using tape to hold the parts of my objects together, combined with glue. Even though I faced these challenges I am happy with how the graphics turned out on my object. Looking back on it I wish I did spend more time investigating the "hole" construction method so I didn't have to rely so much upon glue and tape. For the final phase of the object I am going to find a way so I don't have rely so much on the ugly outside taping and delicate glue.

Sunday 30 October 2016

Papercraft Prototype V1

After making papercraft samples in Rhino the next step was to choose one to import into Illustrator and then print out to fold into its shape. This of course is a protoype to see what works with the object and what doesn't.


I first printed out my templates on regular paper to see if they were big enough and easy to fold. I found that they were too small and weren't going to be easily folded, so I scaled up my templates.


The core of my object in template form ready to be cut and scored.


Template cut out.


Then folded.


Some secondary pieces of my object cut and beginning to be folded.


All of the pieces of my object folded and glued, the next step is assembly.


My object in its final form.


Overall I was fairly happy with how my prototype worked out, however I did come across some challenges and there are some things about my object that I would change. Firstly as I mentioned above I originally had to scale up my templates as they were going to be too hard to fold on cardstock at a small size. There were certain tabs on the "cap" of my rectangular spikes that I didn't need and were just getting in the way when folding and glueing. I did try two different methods of tabs for the rectangles and found one method better that the other. Another challenge was glueing, my object is a little hard to handle when it comes to glueing it together. I needed to add more glue to certain parts of my object to make sure it could support itself.

Sunday 23 October 2016

Papercraft Object Samples in Rhino

For this project the objective was to make some simple papercraft objects in Rhino in both folded and unfolded form.


The main challenges I had with this project were firstly installing Rhino on my computer at home. It was a little difficult but then I got the free trial working and it was fine. The second challenge was remembering the tools and commands but once I looked them up it was smooth sailing.